|
|

|
| Release 4.0 |
 |
Quaternion - View Parameters
This tab lets you change all parameters of the camera (or observer), i.e. you can change the position, the orientation, etc.
There are three panels on this tab. The panels are used to group parameters which belong together in some way. Panels can be expanded and collapsed.
The panels are:
- Observer panel: Contains parameters which are used to easily modify the camera position. Most of the time you will work with the settings presented in this panel.
- Position panel: Contains raw positional data (even for the observer): In case you want to manually enter the position of the camera, the view point, etc., then you can do that here.
- Projection panel: Contains parameters which control the projection.
Observer Panel

Fig.: Observer Panel
Let me first describe the principle for specifying the observer position: Although you can specify the observer position directly by entering the 3D coordinates
this panel allows you to specify that position in a more intuitive way.
When you see a quaternion, you can "rotate" around that object. This is much better and much more intuitive:
Most of the time you don't want to specify some abstract 3D point which should be the observer position. No, most of the time you simply want
to rotate the object by , say, 30 degree horizontally, because this seems to be an interesting area worth looking at.
And you can do that...
- Rotate Around: Here you can specify whether you want to rotate around the view point or around yourself. If you are looking at an object you normally want to rotate around the point at which you are looking at. But imagine you've zoomed in and you are in a deep cavern inside the quaternion: Then you normally don't want to rotate around the point you are looking at. Instead, you want to switch your head to the right or left or up or down: Thus you want to rotate around your current position.
- Horizontal Observer Angle: ChaosPro won't bother you with the current horizontal observer angle. Indeed, who cares? You see the object, and you want to rotate it, so simply do it regardless the current horizontal angle or any other parameter.
By dragging the slider you rotate the object horizontally. ChaosPro always internally maintains all other parameters in order to give you the possibility to rotate horizontally relative to your current observer position.
Just imagine you are at some location, looking at any point, you have rotated yourself: Now horizontally does not mean "rotate in the x-y-axis". No! Horizontally for YOU means, rotate horizontally relative to my current position, my current orientation regardless the coordinate system!
Perhaps this seems to be clear? Well, mathematically this is quite difficult, especially if interpolation of the observer position should be implemented, too (or don't you want to create animations flying around a quaternion?). This slider can be dragged from -90 degree to +90 degree. After you are finished changing the horizontal rotation angle it will switch back to 0, thus allowing you to rotate by another 90 degree.
- Vertical Observer Angle: Again, ChaosPro won't bother you with the current vertical observer angle. This parameter lets you simply rotate vertically to your current observer position.
- Distance: This parameter specifies the distance from the view point: It lets you change how far you are away from the view point. The parameter is expressed in % of your current distance. ChaosPro won't bother you with the current distance in any unit as this information is just a meaningless number.
Instead. By dragging the slider you can reduce the distance to the view point or you can increase the distance. After having adjusted the distance the slider will snap to the middle position and again show "100%". You can then adjust the distance again.
- Rotation: This parameter lets "rotate" the observers head: The position gets not changed. Instead, the observer rotates himself around the view axis.
Example? Ok, you must rotate your head by 90 degree in view axis in order to correctly recognize the following: ;-)
Position Panel

Fig.: Position Panel
The position panel now lets you define the 3D coordinates directly. Most of the time you might want to collapse that panel, but perhaps you feel more comfortable
specifying these values directly.
- View point: This is the null point of the system: The point at which the observer looks at, the point around which the observer "rotates", the point to which the observer zooms in or zoomes out (if the distance should change).
- Observer: This is the position at which YOU are supposed to be, i.e. the observer of the scene, your eye or whatever you may call it.
- Top: Specifies the top vector, i.e. the direction which is up. If you live on the earth, then "up" normally points to the sky. But if you look at a :-) it's sometimes helpful to bend your head to the left, thus Top points to the left...
|
Projection Panel

Fig.: Projection Panel
- Clipping Planes: The clipping planes specify the frontmost and backmost part of the area which is scanned. Only the part of the quaternion which lies between the frontmost and backmost clipping plane is drawn.
- Relative to VP: If checked, the clipping planes are defined relative to the viewpoint. If not checked, the distance of the clipping planes are relative to the observer.
- Front and Back: Specifies how far away the frontmost and backmost clipping planes are.
- Adjust: Sets the clipping planes so that the quaternion which is currently visible is contained in it. As it gives a speed up and a quality increase at no extra cost setting proper clipping planes is a good thing.
Depth of Field When you take a picture using your camera you will for sure know that you need to set the focus correctly. The area which you choose to be in focus appears sharp, other areas appear more blurry depending on how far away they are from the focus point.
Computers do not have this possibility by default: When rendering artificial images there is no focus: All areas appear sharp, i.e. are in focus. Although this seems to be good as everything is sharp and clear the image looks artificial due to that: We are not used to look at 3D objects which appear totally sharp!
As such, in order to add some more realism to 3D objects ChaosPro artificially adds the blurry effect (depth of field).
Although ChaosPro uses a reasonable algorithm in order to add the depth of field effect it has some drawbacks: Normally you zoom onto the object very closely. This is not very natural: Suppose you are trying to take a picture from an object using your digicam which is round about 0.001 mm away. That's what ChaosPro needs to render. Basically it is a microscope. As such, the parameters below should not be interpreted as "real" values. Experiment with aperture and focal len. Don't try to match them to real world values. It won't work.
- Aperture: Specifies the camera lens size in mm. Normal values are 5 mm to 20 mm.
- Focal Len: Defines the focal length, normally round about half of the plane distance is good.
- Plane Distance: Specifies the distance at which points are in focus. If set too near or too far, the whole object is blurry. ChaosPro sets it by default to the average distance of the points around the viewpoint: So the middle of the object appears sharp.
- The left button adjusts the settings to some reasonable values. The right button is the "Auto Adjust" button: When pressed/activated ChaosPro will overwrite your values whenever it renders the object using reasonable values.
So if you adjust aperture, focal len and plane distance, deactivate the "Auto Adjust" button.
- For more information about depth of field see Depth of Field (Wikipedia)
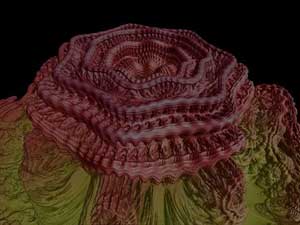
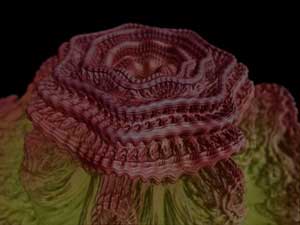
The following two images show the depth of field effect:
| Depth of field off: The image below appears sharp at any distance. Looks ok, but somewhat unnatural. | Depth of field on: Do you see the blurry areas? The focus is in the middle of the image. Areas which are farther away than these areas appear blurry. |
|
|
- Aspect Ratio: Normally 1, specifies the ratio from width to height.
- Field of View: Contains the angle of the perspective projection in degrees, or in other words: The view angle which your eye has. Normal values are 30 or 45 degrees. If you change this value it may seem as if the object just gets smaller or larger. But beware! When animating an object you will see the difference: If set to an "unnormal" value (too low or too high) the angles of the objects seem to be unnatural. This may not be relevant for fractal objects, as the visual appearance is not natural anyway, but if you e.g. animate a cube you will see that it looks not as expected, as the 90 degrees of each side seem to be somewhat "strange" and "distorted".
|
|


