This chapter should make you familiar with the problems one can encounter when one tries to calculate a 3D view of a fractal. At first I have to mention, that you cannot calculate a 3D transformation for all fractal types. For some types this simply doesn't make sense. A first presupposition is that the function which calculates the color for any complex number has to be a continous function to produce reasonable results. Fractal type '24 bit Julia', '24 bit Mandel', 'Plasma' and 'Lyapunov Space' fulfill this presupposition. Other types may produce some results, due to the non continous function there of course are sudden 'jumps' in the height field, which can't be avoided and really look annoying.
|
Lets make an example. Assume we want to create a 3D transformation of "Black_Hole". At first we calculate the image. It will look like that:
After you have decided that you want to calculate a 3D transformation, you have to tell your decision to ChaosPro. This is done by placing a check mark at menu item Fractal / 3D Transformation. After having calculated the flat 2D image of the fractal, the 3D transformation is performed. So you have to wait some time until you see a 3D image. |
 |
| A quite boring image will appear, as you can see at the right side...
Now why is the image so boring? Well, the main reason is that ChaosPro has to transform an iteration value to a height. Well, it can do so by simply saying that iteration value 1 is height 1, iteration value 2000 maps to height=2000. But that would almost never produce any reasonable result. So the height transformation is user defineable. And the default height transformation is not suitable for this fractal (in fact, it is suitable only for the standard Mandelbrot set when zoomed out). So we have to change the height transformation function. It can be defined in the 3D parameter window, Tab 2. Please open it and go to Tab 2... |
 |
|
If you change any 3D parameter, the fractal basically stays the same, i.e. the 2D image does not have to be recalculated. If you change any fractal related parameter, then of course the fractal will be recalculated, after that the 3D view is adjusted... | |
|
Ok, lets have a look at the height transformation function. At first, choose the scaling of the display field to match the fractal.
The fractal Black_Hole produces iteration values from 1 to a maximum of 5000 (maximum number of iterations).
Choose XMin=0 and XMax=5000 (see marked fields in the image beneath) We now can adjust the height transformation function to our needs. We have control over the full range of iteration values of from Black_Hole! At first, the existing control points are totally wrong. Delete them by activating them (click onto them) and pressing the delete key on your keyboard. The 3D view will be recreated as you delete control points. When the control points have been deleted, place new control points into the field, it does not matter where, simply add about 3 control points uniformely spread over the field (adding control points is done by double clicking at the desired place). You should see that the 3D view produces a "result". |
 |
| Ok, now play around a bit with the control points. Drag them around and watch the 3D view to get a feeling how it works. My height transformation function now looks as follows: |  |
|
And the result looks like that:
Quite strange...the problem is that the data is not smooth enough: One pixel has an iteration value of 500, the pixels in the neighbourhood have values of 2000,3000 and 4000! And these pixels of course produce totally different heights. And this leads to those stalks in the image. |
 |
| But as you can imagine, there is a solution: Some kind of smoothing must be applied! Please go to Tab 3 of the 3D Parameter Window and check the "Smooth heights" checkbox. My image now looks much better: |  |
And if you like, you can colorize your image: Go to Tab 3 and deactivate "One base color". This means your fractal does not use one base color and modify the darkness of this color. Instead, it uses the original colors from the fractal and modifies the darkness of those...
My image now looks much better.
And then you can adjust the view angle, the height transformation function, the palette or whatever you like. You can even calculate an animation of a changing height transformation routine, i.e. the fractal mountains disappear and morph to valleys or whatever you like. |
 |
My result after playing around with the other parameters looks as follows, perhaps your image is even nicer?
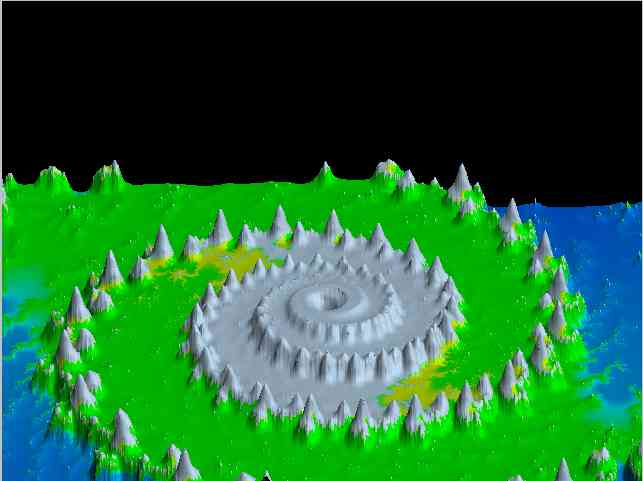
Well, you should now have a good starting point for 3D transformations. Good luck!
Last update on Aug 08 2010.